REVIEW · NARITA
From Narita Airport: Private Layover or Transit Guided Tour
Book on GetYourGuide →Operated by Orange Inc. · Bookable on GetYourGuide
A short layover can still feel like Japan. This private Narita transit tour turns a waiting period into real street time, temple atmosphere, and food you can taste. I especially liked the chance to visit Naritasan Shinshoji Temple and see the Goma Prayer ceremony, and I loved the way guides like Fusako and Chiho help you connect the dots between what you’re seeing and how people live.
One thing to weigh: it’s a walking-focused plan with airport-style security and a couple of cash and timing details, so you’ll want decent shoes and a little planning mindset.
What makes it work so well is that it’s designed for transit reality. You get picked up at Narita Airport or Narita Station, take a quick train ride, then spend your time on the most “local” bits near Naritasan. I also liked the practical help on the ground, like getting train tickets handled smoothly and even sorting out locker access when needed, which can matter a lot when you’re short on time. The main drawback is simply that lunch costs extra and some shops don’t take cards, so you’ll want cash ready.
In This Review
- Key Highlights Worth Marking on Your Mental Map
- Why This Narita Layover Tour Beats Waiting Around
- Price and Value: What $277 Buys (and What It Doesn’t)
- Meeting Your Orange-Ready Guide at Airport or Narita Station
- The 15-Minute Train Ride That Sets the Tone
- Naritasan Omotesando: Old Streets, Easy Browsing, Real Snacks
- Shinshoji Temple and the Goma Prayer Ceremony
- Lunch at a Local Restaurant: Seasonal Choices and the Eel Factor
- Your Extra Time in Narita: Use It to Match Your Energy
- Practical Stuff That Makes or Breaks a Layover Tour
- Who This Tour Is Best For
- Should You Book Orange Inc.’s Narita Layover Tour?
- FAQ
- How long is the Narita layover guided tour?
- What is the price for this experience?
- Where can the tour start in Narita?
- Is this tour private?
- What is included in the price?
- What costs extra?
- Do I need cash?
- Is the tour wheelchair accessible and does it run in rain?
- What should I bring?
Key Highlights Worth Marking on Your Mental Map
- Private guide who customizes the pacing and the parts you focus on
- Naritasan Omotesando: a traditional-feeling street with snacks, shops, and eels
- Shinshoji Temple: a long-standing spiritual site that you can take in without rushing
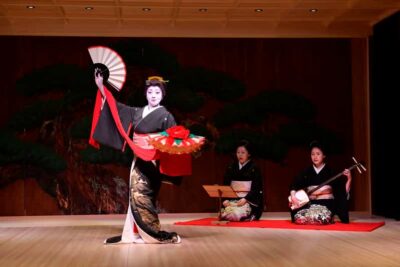
- Goma Prayer ceremony: one of the most memorable cultural moments in the area
- Lunch that fits the season with options like eel, soba, udon, tempura, and more
Why This Narita Layover Tour Beats Waiting Around
Narita can be a time trap. You land, you pass through security, and suddenly you’re stuck in airport mode: shops, seats, and the same four walls repeating in your mind. This is different. You use your layover to see the Narita most people never notice—temples, older streets, and the everyday rhythm around them.
The heart of the experience is that it’s built for short time. You’re not trying to “go to Tokyo.” You’re staying close enough to move confidently, yet far enough that the air, sounds, and sights feel unmistakably Japanese. Guides also tend to make it feel personal. People have booked for long layovers and still left with the feeling they did something meaningful, not just a checklist.
In a 4-hour window, the biggest win is the pairing: streets + temple. Omotesando gives you that sense of place—shops, browsing, local snack culture—then Shinshoji Temple shifts the mood to something older and more ceremonial. If you like travel that has contrast (not just more buildings), this is a strong fit.
You can also read our reviews of more tours and experiences in Narita.
Price and Value: What $277 Buys (and What It Doesn’t)
The price is listed at $277 per group up to 4 for about 4 hours. That means if you’re traveling as a small group or family unit, you can spread the cost. It’s also private, so you’re not sharing your guide with strangers who move at a different pace.
Now the honest part: you’re paying for a guide’s time, their local know-how, and the convenience of pickup plus a planned route. Train fare and lunch are not included, and you’ll need cash for some purchases. In other words, you’re not buying a full meal tour bundle. You’re buying a guided, efficient cultural hit during transit time.
So is it worth it? For me, the value logic is simple:
- If you’d otherwise sit idle at Narita, this is a conversion of waiting time into “real travel.”
- If you want a temple experience plus a classic old-street stroll without stress, the guide earns their keep.
- If you’re the kind of traveler who hates uncertainty—finding meeting points, buying the right ticket, figuring out locker access—this kind of private help is exactly what you’re paying for.
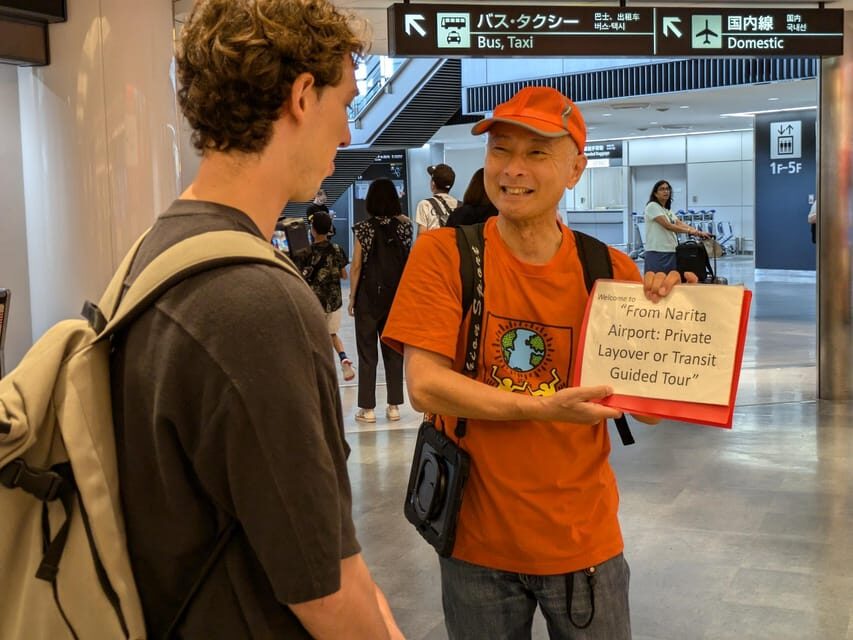
Meeting Your Orange-Ready Guide at Airport or Narita Station

Pickup is straightforward, and that matters when you have limited time and big luggage pressure.
You can start at either:
- Narita Airport: near the Tourist Information Center in the Visitor Service Center area on the Arrival Level of the Central Terminal Building (Terminal 1). The guide will be wearing something orange.
- Narita Station: right outside the east exit near the Tourist Information Center. Again, the guide will be wearing something orange.
Why this is a big deal: short layover tours live or die by the handoff. Several guests have highlighted clear communication and helpful meeting-point photos, which reduces the panic of wondering if you’re at the right spot. If you’re landing tired, this kind of clarity is gold.
Also, the tour is private, so your guide can slow down when you need it. One guest even mentioned the guide was flexible after unexpected delays, which is exactly the kind of real-world benefit you want from a layover tour.
The 15-Minute Train Ride That Sets the Tone
After pickup, you take a short train ride toward Narita’s local sights. The exact time is brief—about 15 minutes each way—so you’re not losing your day to transit.
This segment does two things for you:
- It gets you out of the airport bubble quickly.
- It gives the guide space to explain what you’re about to see, so the first steps feel less random.
If you’re worried about language barriers, don’t be. The guide can help you handle train tickets and move as a group with purpose.
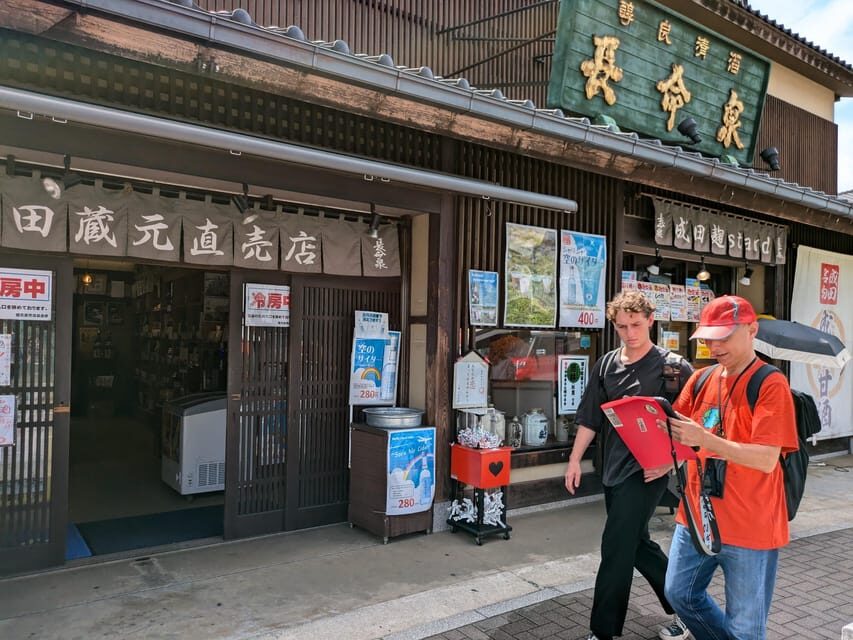
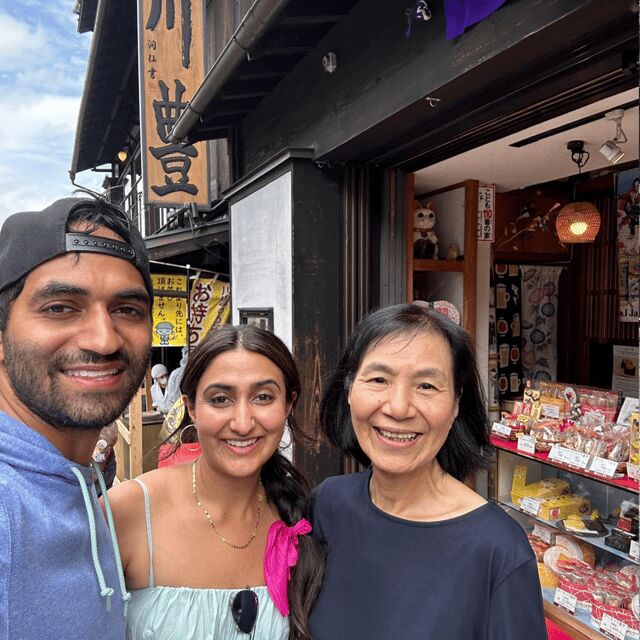
Naritasan Omotesando: Old Streets, Easy Browsing, Real Snacks
Omotesando is where the “Japan feeling” starts. Think: a street designed for strolling, browsing, and snacking—older storefronts, incense-adjacent temple energy in the air, and that pleasant sense that locals come here at a normal pace.
You’ll spend about an hour on this section with your guide.
Here’s what makes it valuable:
- It’s not just sightseeing. It’s cultural texture. You get to see how people actually spend time in this area—what they buy, what they look at, and how the street works as a social space.
- Your guide can steer you toward food that matches your tastes and your time limits.
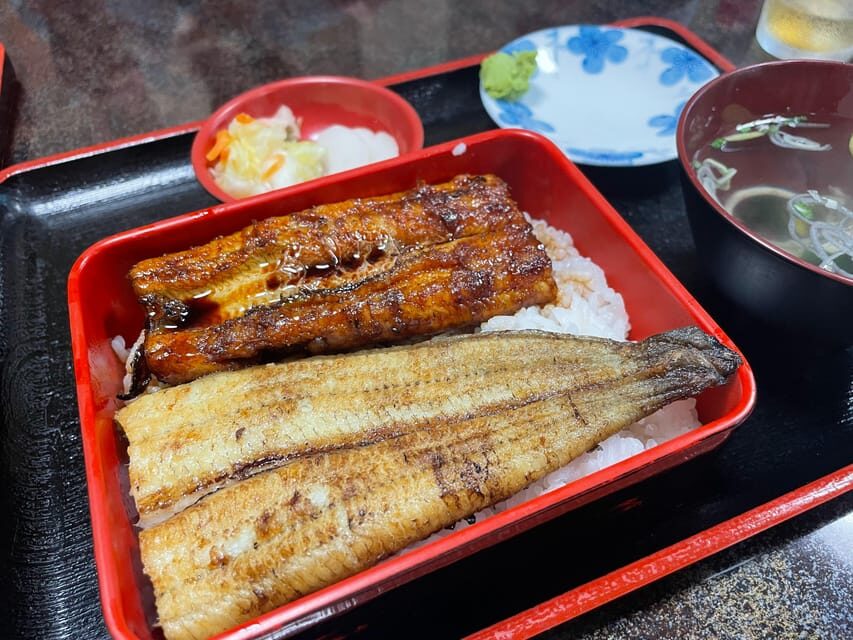
Eel is a recurring local specialty you may see featured in this area. Guests have reported ordering eel and pairing it with dishes like soba or udon at lunch, and guides often build the day around that seasonal rhythm of what’s good right now.
Tip from real layover logic: treat Omotesando like the warm-up. Walk, look, and don’t try to buy everything. Save your final purchases for later in case your mood (or budget) shifts after you eat.
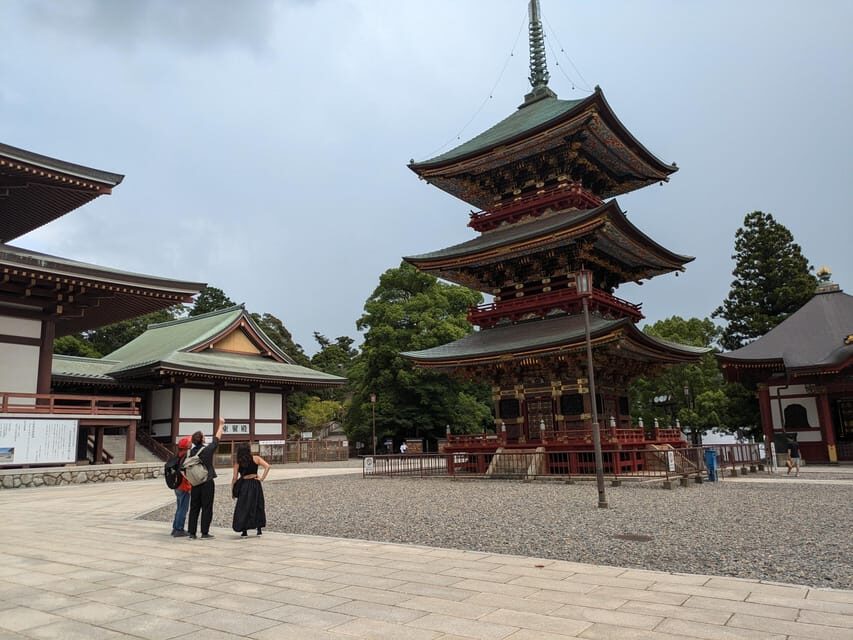
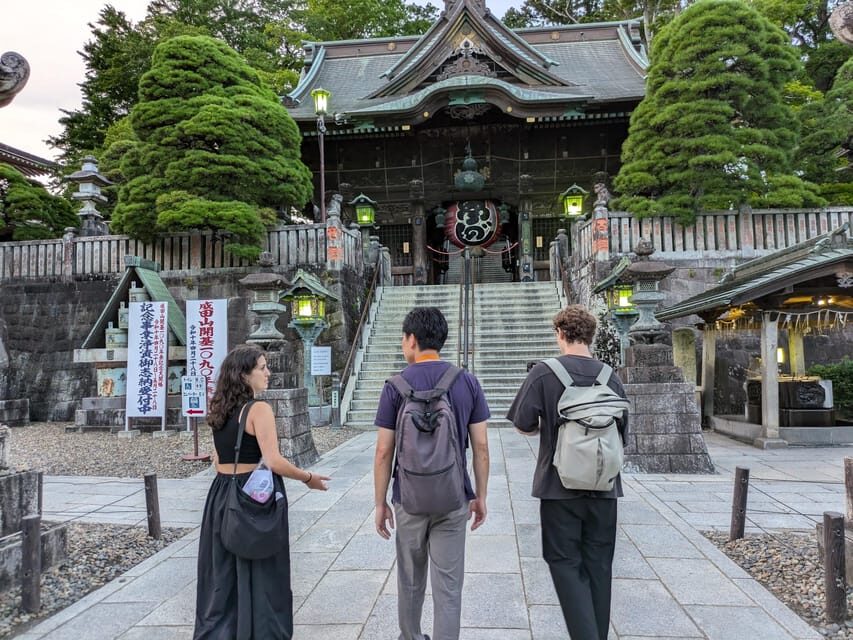
Shinshoji Temple and the Goma Prayer Ceremony
Then you shift gears at Naritasan Shinshoji Temple. You’ll have about 30 minutes in the temple area with guided context.
The biggest cultural anchor here is Buddhism, plus the opportunity to see the Goma Prayer ceremony. A fire ritual like this isn’t the sort of thing you can safely fake by reading about it. Even if you only catch part of it during a short visit, it helps you understand why this place matters to people, not just tourists.
What I like about the temple timing on this tour is that it’s short enough for a layover, but not so rushed you feel like you’re being herded. You get enough time to notice details—ritual space, the mood, and how the ceremony fits into daily spiritual life.
Also, the guided element matters here. Temple sites can be visually impressive but emotionally vague if you don’t know what you’re looking at. A good guide turns that into something you can actually understand while you stand there.
Lunch at a Local Restaurant: Seasonal Choices and the Eel Factor
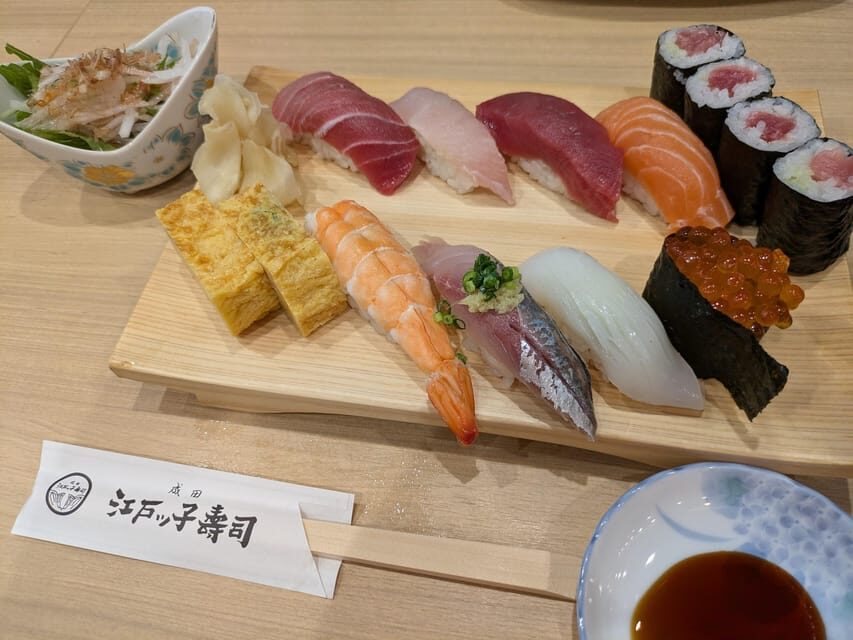
Lunch is not included in the tour price, and that’s important to plan for. You’re given about an hour for lunch, and the menu choices can vary. Typical sit-down dishes are often around 2,000 yen, and slightly higher-end meals can land closer to 3,000–4,000 yen.
What makes this lunch stop better than a generic “nearby restaurant” plan is that the day is framed around seasonal variety and local specialties. You might see options like:
- eel (a standout specialty of the Omotesando approach)
- sushi
- tempura
- soba or udon noodles
Guests have also reported being taken to a tea house for lunch, and in at least one case, a guide helped fit in a traditional tea ceremony during the stay. Because your tour is customizable, your guide can sometimes use your schedule to add one more cultural layer, as long as timing and availability line up.
My practical advice: set a budget that includes lunch plus a little extra for snacks or souvenirs after. Some shops don’t accept credit cards, so deciding what you’ll buy after you eat (instead of before) can help you avoid rushed decisions.
Your Extra Time in Narita: Use It to Match Your Energy
After the temple and before lunch, the schedule includes free time (about 2 hours) and then lunch for about an hour.
Free time can be a double-edged sword. On the upside, it lets you adapt to your own needs: you can browse more on Omotesando, grab additional snacks, or linger where you feel pulled. On the downside, if you’re unsure what to do, free time can become aimless.
This is where the guide’s value shows. Your guide can tailor the day, recommend what’s easiest to enjoy with the remaining time, and help you avoid getting stuck at the wrong entrance or timing the wrong ritual window.
If you want a simple strategy:
- Spend the earlier free time browsing and doing small purchases.
- Keep a little stamina for later. A layover day can feel longer once you add walking and heat.
Practical Stuff That Makes or Breaks a Layover Tour
This tour runs rain or shine, and it’s a walking plan. That means you need to prepare like you’re sightseeing outdoors, not like you’re moving between indoor attractions.
A few practical points that matter:
- Wear comfortable shoes. You’re on foot for the key street and temple areas.
- Bring precautions for heat. It’s recommended to bring a hat, and on extremely hot days the route may change.
- Expect airport-style security to be part of the day. Plan your timing accordingly.
- Leave large luggage at the airport. This is not a “carry everything” situation.
Cash is also a recurring theme. You’ll likely need to cover:
- train fare (around 500 yen, prepare cash)
- lunch (not included)
- souvenirs and small purchases
One guest advice that lines up with the reality here: keep about 10,000 yen in cash if you want the freedom to buy a few things without stress.
Wheelchair access is listed. Since it’s a walking tour, confirm the day’s route with your guide, but it is described as wheelchair accessible, which is a real plus for travelers who need accommodations.
Who This Tour Is Best For
This is a strong choice if:
- you have a long layover and hate wasting it
- you want temple culture plus classic street wandering in a tight time window
- you prefer private guidance over figuring things out solo
- you care about food and want local specialties like eel, soba, and udon to land naturally in the plan
It’s also a great fit if you’d rather not deal with small friction points—finding a meeting spot, buying transit tickets, or sorting luggage access. Several guides have been praised for stepping in with exactly that kind of help.
If you’re the kind of traveler who wants big-city museums and far-away neighborhoods, this won’t feel like that. This is a close-to-the-airport cultural plan. The payoff is in being efficient and real, not in covering every famous landmark.
Should You Book Orange Inc.’s Narita Layover Tour?
If you’re sitting on a layover and thinking, I could either do nothing or get a taste of Japan, I’d choose this. The best argument is that it turns waiting time into a meaningful cultural sequence: Omotesando street life, Shinshoji Temple, and the Goma Prayer moment, then lunch that isn’t just filler.
Book it if you value:
- private, customizable guidance during transit time
- food stops that match local specialties (eel and noodle dishes show up often)
- a “get your bearings” experience that makes Narita feel less like an airport corridor and more like a real place
Skip it (or at least rethink) if:
- you want to minimize walking at all costs
- you can’t manage cash needs or extra costs for lunch and transit
- you don’t like ceremonies or religious sites and would rather spend the day purely on shopping or museums
If you fall in the first group, you’ll likely come away feeling like your layover didn’t just pass—it turned into part of the trip.
FAQ
How long is the Narita layover guided tour?
It lasts about 4 hours.
What is the price for this experience?
It’s listed at $277 per group, up to 4 people.
Where can the tour start in Narita?
You can choose pickup at Narita Airport (Terminal 1, near the Tourist Information Center in the Visitor Service Center area on the Arrival Level) or at Narita Station (near the Tourist Information Center right outside the east exit).
Is this tour private?
Yes, it’s a private group tour with a dedicated guide.
What is included in the price?
A private guide and a customized tour are included.
What costs extra?
Lunch is not included, and train fare is about 500 yen (cash is recommended). Baggage storage fees are also not included.
Do I need cash?
You should bring cash. Some stores may not accept credit cards, and train fare and meals may require cash.
Is the tour wheelchair accessible and does it run in rain?
Wheelchair accessibility is listed, and the tour runs rain or shine.
What should I bring?
Bring comfortable shoes. It’s also recommended to prepare for heat (like bringing a hat), and bring cash for purchases and transportation.